How to Build Your Own Dip Bars
How to Build Your Own Dip Bars
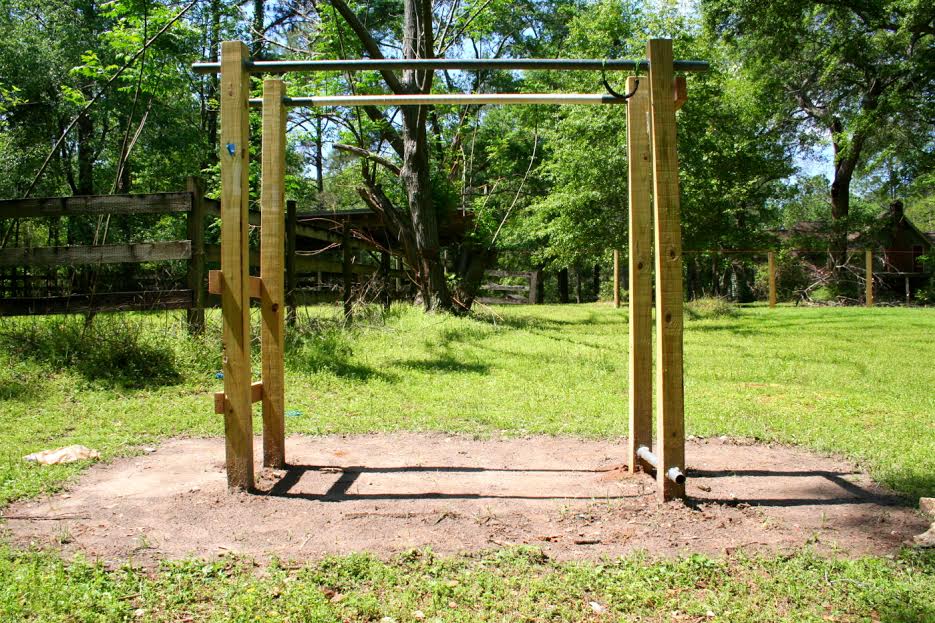
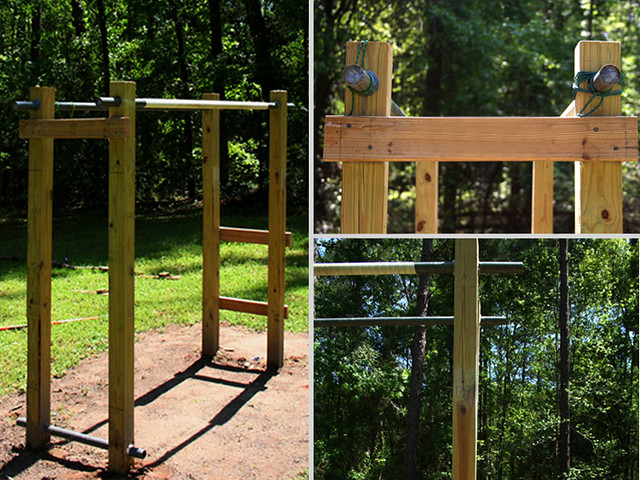
You don’t need a gym membership to get a good workout. If you have space on your property and can rent or borrow some tools, you can build your own backyard gym. While this dip bar may look like it’s something just for one type of workout, you can also use it for sit ups and pull ups.
This was also built with available tools and while it may not be the best or easiest way to build yours, it should help give you an idea of where and how to start.
Note: I included the plans for adding a Sit-Up bar, which is optional. However, if you think you may want one in the future I suggest you follow my instructions on drilling the holes for it now as it will prove difficult to do once the posts are set in the ground.
Tools and Supplies
- 4 Pressure Treated Posts (8′ x 4” x 4”)
- 1 Pressure Treated Board (8′ x 2” x 4”)
- 2 Galvanized Metal Poles (1-5/8” diameter x 7′)
- 1 Galvanized Metal Pole (1-5/8” diameter x 28”)
- Optional. Could be used for a sit-up bar.
- 1 Tube of Silicone based sealant
- Handful of Galvanized Nails or Wood Screws
- Power Drill
- Hammer or drill bit for your Wood Screws
- 2” Hole Saw Bit with Arbor Bit
- 1/8” Drill Bit (at least 4 inches long)
- Straight Edge Square
- Caulking Gun
- Hand Saw
- Post Hole Shovel
- Measuring Tape
- 2 Saw Horses/Elevated Work Platform
- Sharpie or other Marking Device
- Clamps
Once you have your tools and materials assembled, it’s time to start the build.
STEP 1: Cross Boards
Measure your 2×4 into four equal pieces each 2 feet long and cut them with your hand saw. These will be your cross boards and you can set them aside for now.
STEP 2: Post Construction
Lay out your four 4x4s on your saw horses and establish which side of each post is going to be the top and bottom. Then decide which of the two posts is going to have your Sit-Up bar running through it. When deciding the top and bottom of your posts, keep in mind that it is both difficult and unwise to drill a hole through a knot in the wood.
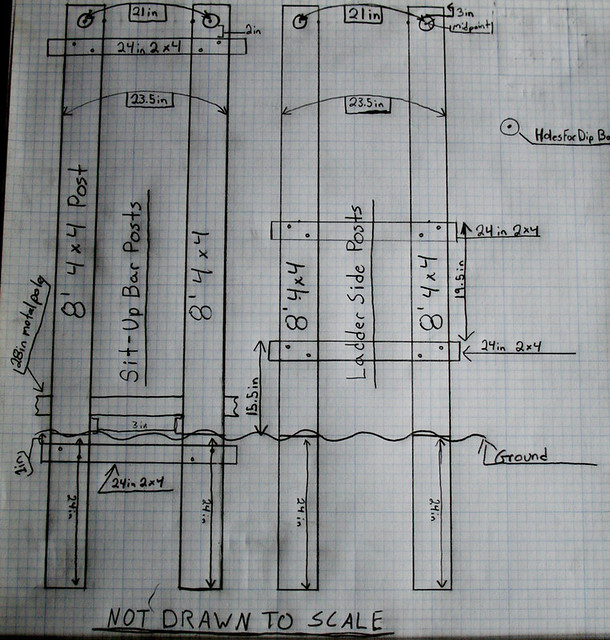
STEP 2.1 Mark each post with a line 2 feet from the bottom. This line will represent how deep each post will be buried. I recommend that you mark this as “BURY LINE” on all four sides of the post.
STEP 2.2 Mark each post at the point where your cross boards will go. This will be different for each pair of posts because one side’s cross boards are going to act as a ladder.
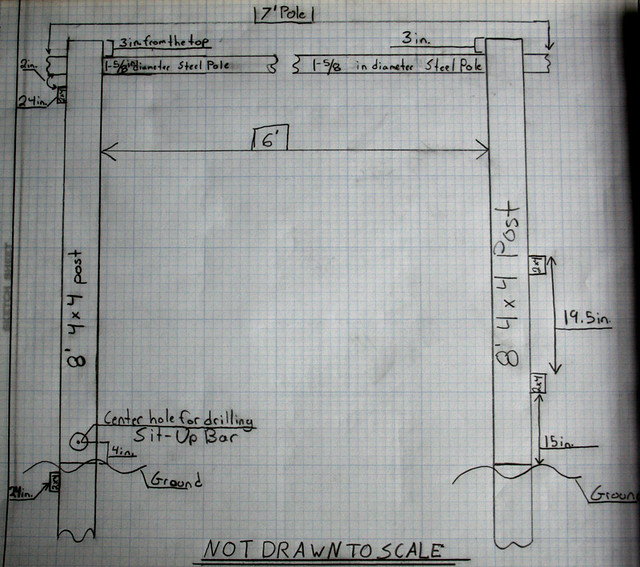
STEP 2.21 Ladder Posts’ Cross Boards: Mark your first lines 15.5 in. above the bury lines. The top of your cross board will lay on this line. Mark your second line 19.5 in. above the previous line. As with the previous board, the line you make is where the top of the 2×4 will sit. Make sure to use a square to draw your lines, as this will help you maintain level dip bars and ladder rungs.
STEP 2.22 Sit-Up Posts’ Cross Boards: Mark your first lines 1 in. below the bury line on both posts. Mark your second line 7 in. from the top of the two posts. Make sure to use a square to draw your lines.
STEP 2.3 Mark the posts where you’ll drill holes for your dip bars. To mark these holes, measure 4 in. down from the top of the post and make a line horizontally across each post with your square. On that line find the midpoint, approximately 1.75 in. from either side of the 4×4, mark this spot and make a vertical line with your square. The spot that these two lines intersect is where you will drill your guide hole. Repeat this process for all four posts.
STEP 2.4 Grab the two posts that you decided to put your Sit-Up bar in and in the opposite plane, (i.e. perpendicular to the dip bars) you’ll mark your holes. To mark these holes, measure 4 in. up from the bury lines and make a horizontal line with your square, and then find the mid point, approx. 1.75 in. from the edge. Make a vertical line on this mark and their intersect point will be the spot for the guide hole, much like the holes for your actual dip bars.
STEP 3: Drilling Holes
All six holes will have the same method for drilling. First take your 1/8 in. drill bit and drill straight through the posts where you made you intersecting marks in steps 2.3 and 2.4. This will serve as your guide for the 2 in. hole saw with 1/4 in. arbor bit.
I wasn’t able to find a hole saw that was deep enough to drill straight through the post in one shot so once you drill into the hole saws’ extent, flip the post over and repeat from the other side. This is why it is important to drill all the way through with your 1/8 in. bit first, to create a guide hole. Once you get your first hole routed through, repeat this process on your 5 other spots.
Editor-in-Chief’s Note: One thing that’s not mentioned when drilling holes, is that if you don’t want the bars to turn on you when doing pull-ups, I’d suggest drilling a hole running perpendicular to the bar in each 4×4 post while the bar is inserted. Then just insert a bolt and nut to keep each bar stationary. This step is of course completely optional, but I had good success with this method when constructing my backyard pull-up bars.
STEP 4: Assembly
Assembling the posts, lay out the two posts that are going to have the sit-up bar running through them. Make sure your holes are going to line up and then grab two of your 24” 2×4 cross boards. Measure and make a vertical line with your square a quarter inch in from both sides of the 2×4. (You can go ahead and do this for all four 2x4s now.)
Now, lay out the first 2×4 on either of your marks from STEP 2.22, make sure the top of your 2×4 is the side that is on the line, and make sure that the marks on your 2×4 line up with the sides of the 4×4 posts. Use nails or screws to attach this 2×4 to the post, 2 per post are sufficient. I used clamps at this point to insure that the 2×4 did not slip out of alignment as I was attaching it to the 4×4 post. Repeat this process for all cross boards on each line from STEPS 2.21 and 2.22 until all four 2x4s are attached and square.
STEP 5: Site Selection
When selecting a spot for your dip bars, you will want to find a location that has as little contour change as possible and I suggest you find a spot that doesn’t have a threat of branches or anything falling on it. This spot will need to be at least 6′ long and 2′ wide and be able to have 2′ deep holes dug into it. Be mindful of underground wires and septic pipes.
Use your post hole shovel to dig four holes 2′ deep and only as wide as your post hole shovel. These holes should be 24 inches apart from their two outside edges and 6′ apart from their inside edges. Refer to drawings for clarification. On whichever side you decided to put your sit-up bar make sure to dig a small trench about 6 in. deep between the two holes for the 2×4 to rest in.
With your level, do your best to make these posts as straight up and down as you can. This process can sometimes take quite a while but it is a very important step so take your time. Make sure that they are level on both planes of your posts. You can use your metal poles to help you ensure that both sets of posts lie on the same line. If you are not an avid digger, you may find it easier to align your poles properly if you get one set of posts in the ground both level and filled back in with dirt to hold them in place.
Next, measure from that set to find the spots for your other two holes. I’ll leave it up to you to decide which you find easier. You may find that your posts don’t rest in the ground all at the same 2′ bury line, this is fine as long as the majority of them are at or below this line. Especially the two posts that have the 2×4 underground.
Now make sure you fill the holes back in with dirt and do your best to pack the dirt in as tight as you can. You could use concrete to set the posts but I found that dirt worked just fine for this purpose. You will have to wait approximately 1 full week for the dirt to fully harden before you can use them, but it is worth the wait.
STEP 6: Finishing Touches
Slap on a couple of ITS Tactical stencils and decorate as you see fit.
STEP 7: Test and Work Out
Remember, freedom isn’t free!
Editor-in-Chief’s Note: Please welcome Justin Wooden as a contributor on ITS Tactical. Justin is an Aviation Ordnanceman in the US Navy as well as an avid rock climber and all around adventure sports enthusiast.




Discussion