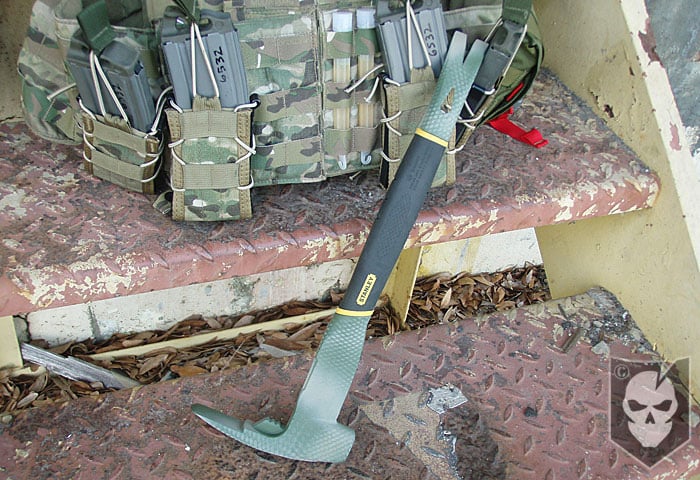
In this article we are going to show you how to make a low-cost low-profile entry tool that you can pick up at your local Lowe’s or Home Depot.
I came across this idea over at Lightfighter.net when I was looking at a thread called Active Shooter Loadouts. Around that time I had taken a class by John Giduck on active shooters and the Beslan School siege, Amish massacre, and the Virginia Tech shooting. It was quite eye opening and John brought up some good points on the need to be able to breach your way into one of these events.
Why a Breaching Tool?
These two examples show that law enforcement first responders can really be slowed down during the critical seconds/minutes of the event. If your agency is like mine, only supervisors have breaching tools in their vehicles. I know some agencies that have them back at the station (which is insane).
I don’t know about you, but I’m not waiting around for someone else to show up with the tools I need. If you’re like me and don’t have hundreds of dollars to spend on breaching tools, then this DIY entry tool may be for you. Why not convince your squad/sector/team mates to make one also?
While these examples are military and police related, who can forget hurricane Katrina and other natural disasters? If you work and live overseas you just have to look at the news to see the civil unrest happening right now in the Middle East. You never know when you might get thrown into a SAR (search and rescue) type event or have to get your family out of a bad situation. Having tools to breach doors and other obstacles is just as critical in the civilian world. I’m also certain you could use it to dispatch zombies with ease.
Stanley Fat Max FUBAR
- CHEAP!
- 4-in-1 tool for prying, splitting, and striking jobs.
- One piece forged steel bar for increased durability.
- Two-tiered jaws for grabbing common dimensional lumber & decking (which we will be cutting off).
- Textured grip for excellent comfort & control, even when wet.
- Tempered steel that prevents chipping.
What it’s not:
- It is not shielded against electricity like some Hallagan tools.
- It is not considered “non-sparking”, although I’ve whacked a bunch of stuff and so far no big sparks.
- A replacement for proper breaching tools if you have them.
What you’ll need:
- A Stanley Fatmax FUBAR. I bought this one at Lowe’s for under $35.00 but the amazon.com link to the left has them for about $17 plus shipping.
- A vice or something to hold the bar steady as you make your cuts and for grinding.
- Face, eye, and hearing protection.
- Gloves and proper clothing.
- A electric angle grinder. In theory you could use a hacksaw or other tool but the cutoff wheel is your best bet.
- Cutoff wheels and grinding disks. I also used a sanding wheel attachment to rough up the paint if desired.
- Paint of choice and masking tape.
Stanley also makes a Fubar Forcible Entry Tool. The 18″ tool costs about $70.00 + and you can’t pick it up at your local hardware store. While it does have some cool features, they are mostly geared toward Fire Fighters.
I wont go into how to modify it as we put together the following instructional video that shows all the steps. I will say make sure you use your protective gear and make sure you are aware of where the sparks are going. This includes down into your collar and shoes, you don’t want to hurt yourself or catch anything on fire.
How To
I thought about cutting the rubber on the handle off and wrapping it in 550 cord, which always looks cool, but since we are going to be using this tool I decided it wasn’t a good idea. The reason being, when breaking glass you could end up getting small shards stuck in the 550 cord. That would be bad news for you hands even though you should be using gloves. With the rubber it would take a big piece to get stuck and you would be able to see it and remove it without injury.
A KYDEX sheath system is currently in the works by Jason over at JMC Custom Holsters. Jason makes some bad ass custom KYDEX holsters and accessories. Check out the full article Bryan did on Jason’s work.
I contacted Jason and he came over to take a look at the tool and ways it could be carried on a TAC style vest. This setup keeps the tool low for good weight distribution. With my particular vest being loaded up front I had to mount it on the back. This is fine as I work on a six man team and one of my buddies can remove it when needed. In a pinch I can get it out by tweaking the vest, but it is primarily set up for a partner to remove.
With the economy being the way it is, I fully understand not having the money to spend on “entry tools.” Whether you’re in law enforcement, the military, a MIL contractor, or on the civilian side, sometimes you have to think outside the box and get creative. If you’re overseas, you can have a family member or friend run over to Lowe’s or Home Depot and mail you a Fatmax FUBAR too.
I hope this article has shown that you can be prepared without breaking the bank.
We highly recommend getting training on breaching by a legitimate school or organization. We did not talk about or demonstrate breaching techniques on propose.
Stay tuned for a giveaway for one of these DIY Fatmax Breaching Tools that will include a custom KYDEX sheath system by JMC Custom Holsters!!
Please leave any questions or comments you have below
[flickrset id=”72157626169595850″ thumbnail=”square” overlay=”true” size=”large”]
