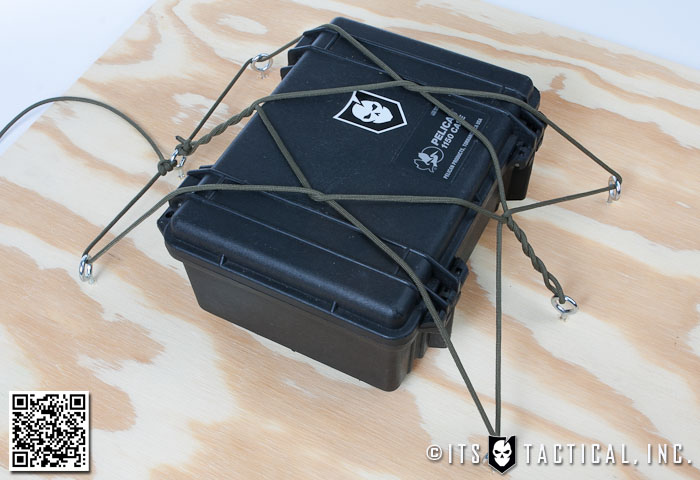
In our latest installment of the Knot of the Week, we’ll teach you how to tie the Diamond Hitch and explain what benefits it offers over traditional methods of securing a load.
What’s truly versatile about the Diamond Hitch is that once tied, it creates a diamond pattern in the center which not only is where its namesake comes from, but is what gives it the ability to compensate for the load shifting.
Whether being used to secure a load to a roof rack, truck bed or even a pack animal, the Diamond Hitch is definitely one to put into your knot tying toolbox.
Diamond Hitch » Hitches
(Strength: 3/Secure: 4/Stability: 4/Difficulty: 3)
Please refer to our Knot of the Week introduction post for a description of what these ratings mean.
Uses:
- Securing a load
- Tie down for a roof rack, truck bed or pack animal
Tying Instructions:
- Attach the standing end of your line to a fixed midpoint in an array of 6 tie-down points.
- Use the working end to span across the load and to the opposite midpoint.
- Route the working end through the second midpoint and back to the original midpoint.
- Wrap or pass the working end through this original midpoint.
- Grasp the double line created over your load and twist the two lines six times or so, creating a diamond pattern in the center.
- Ensuring to keep the diamond pattern, run your working end to the closest corner of your tie-down points.
- Wrap or pass the working end through this corner point and through the backside of the center diamond before passing it down to the opposite corner.
- Wrap or pass the working end through the opposite corner and down through the top of the center diamond and out to the bottom-most corner.
- Wrap or pass the working end through this corner point and back through the backside of the center diamond before passing it to the last corner.
- At this point take a few seconds to adjust the lines and tighten them up.
- Pull tension at the last corner and secure the working end to the midpoint you started at, which completes the Diamond Hitch.