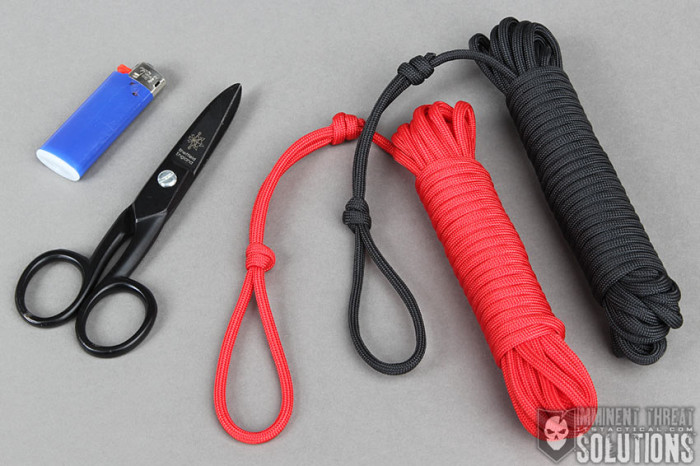
Hojōjutsu is the ancient Japanese martial art of restraint using cordage. This cordage is commonly referred to as Hojo Cord, but properly it’s called Hayanawa and also Torinawa. Respectively these mean fast rope and capture rope.
Used by Japanese Constables and Samurai alike, this method for tying cordage to restrain pre-dates handcuffs and is actually still taught to Japanese Police Officers today. These 30 ft. bundles of cordage would typically be stashed in a uniform blouse by constables, or carried by a Samurai on the Sageo. This was cordage that affixed a Samurai’s sword sheath to his obi (sash).
By simply grabbing the loop formed in the working end of the cordage, a quick slip knot could be pulled to place over the wrist of the prisoner. This served as the initial starting point to intricate rope work that would bind the person for transport. Additionally, Honnawa (main rope) was applied after the initial capture rope was applied to further secure the prisoner long term. Honnawa was typically a thicker natural fiber rope that would allow the Hayanawa or Torinawa to be removed after it was applied.
We’ll go over how to tie up the Hojo Cord bundle on today’s Knot of the Week using paracord, as well as demonstrate a quick handcuff knot on the video embedded below. The article and video won’t get into how to necessarily restrain someone with Hojōjutsu, but there’s plenty of resources out there if you’re interested. It’s still practiced today by schools of Jujutsu.
Hayanawa / Torinawa / Hojo Cord Bundle » Misc.
(Strength: –/Secure: –/Stability: –/Difficulty: 2) Please refer to our Knot of the Week introduction post for a description of what these ratings mean.
You many notice how similar the Hojo Cord is to the Paracord Deployment Lanyard we’ve demonstrated on a previous Knot of the Week. The wrapping is done in a similar fashion, but there are some subtle differences.
Uses:
- Japanese Art of Hojōjutsu – Rope Restraint
- Storing Paracord for Quick Deployment
Tying Instructions:
- Grab the working end of your paracord and measure a 12-14″ section.
- Form a 2-3″ bight at the mid-point of that section.
- Wrap the working end over the standing part and around the backside.
- Cross over your previous wrap and again around the backside.
- You’re not going to pull this working end through the inside of the figure-8 shape you’ve created on top of the standing part.
- Tighten this fisherman’s knot, measure off another 2-3″ and tie a second fisherman’s knot.
- Ensure the working end you wind up with after the second fisherman’s knot is as small as possible and trim/fuse if necessary.
- From this point, suspend the cordage over a “C” shape created by your fingers, with the tied portion hanging below the “C”.
- The remainder of the cordage is now wrapped around your fingers in a Figure-8 pattern to prevent binding as it’s payed out on deployment.
- Once the bundle is formed, ensure you leave 4-5 feet for the wrapping that follows.
- Start the wrapping near the top of the bundle and lock off the first wrap as show in the photos, before progressing with the consecutive wraps.
- After the wrapping is completed, lock off the last wrap by routing it trough the previous wrap (see photo).
- Trim and fuse the working end for security.
- You’re now a ninja, congratulations!
